In this tutorial, I will be going over setting up a Garmin GPS 18 VLC to work with NTP on FreeBSD 8.0. This is the result of many hours of researching and troubleshooting to get everything up and running on FreeBSD. It is based loosely on http://www.satsignal.eu/ntp/FreeBSD-GPS-PPS.htm but as I found out there are a few differences with FreeBSD 8.0. This guide hopefully will help anyone else wanting to operate an NTP server synced to a GPS receiver on a more current version of FreeBSD.
A quick bit of background
If you know what PPS stands for and how NTP syncs to a GPS unit, skip this, otherwise read on. GPS satellites have atomic clocks built in them. Using a GPS receiver we can take advantage of that and synchronise a server to provide time to a network or the Internet.
GPS units output their data in what are called “sentences”. These sentences contain information about location, time, status of the fix and other data. The time that is contained in these sentences is only accurate to that second. This alone is not good enough to synchronise the time with to be a stratum 1 time server. Some GPS units also provide a Pule Per Second (PPS) output. This PPS is a logic high and low that is switched off usually on the DCD line of an RS-232 serial port. The duration is usually around 200ms and this is what we will configure for the Garmin. This PPS has a claimed accuracy that is dependant on the unit. For the Garmin, it is 1 microsecond and is one of the better GPS units around.
Why FreeBSD?
FreeBSD is generally accepted as the best operating system for time keeping. Pulse Per Second (PPS) is supported without patching the kernel sources and has support for nano-second accuracies instead of micro-second accuracies found in 2.6 Linux kernels. This means you should expect accuracies around +/- 3 us. When I was using Linux, I found the accuracy to be about +/- 30 us and sometimes worse depending on the fluctuation of ambient temperature. Take my advice, the small learning curve from Linux to FreeBSD is definitely worth the results.
Hardware
A Garmin GPS 18 LVC is used to sync NTP. This seems to be quite a common unit used to sync NTP and is the primary reason I chose it. It is also fairly cheap as I picked up mine for $100. You will need to wire it up to a serial port as follows.
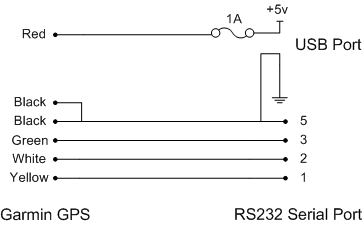
The 5 volts from a USB port is enough to power the GPS unit. I just cut up a USB cable that I had lying around and fed it into the shell of the serial port. It is also a good idea to fit a plug and socket to the cable of the GPS so you can detach the unit. I just used a 6 pin mini DIN plug and socket which is shown in the pictures below.

Garmin on the roof

Cable comes through the false ceiling. One of these days I’ll make it neat :P
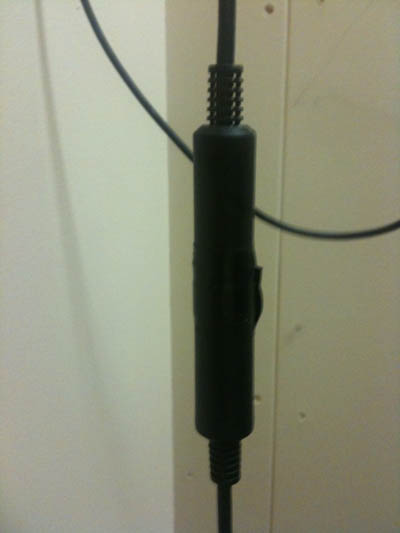
Mini DIN plug and socket. Just don’t short out any of the wires like I did initially.
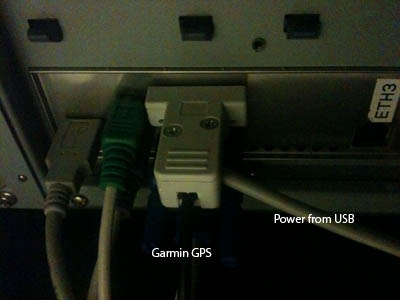
Serial port on the back of the NTP server. Power from the USB port comes directly in through the back shell of the serial.
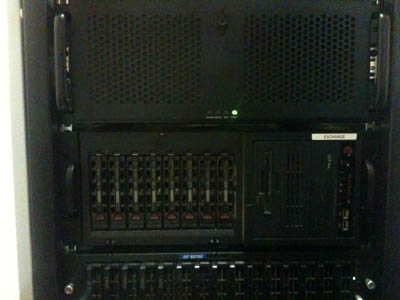
The server at the top is the NTP server. It’s the old router box that we used before moving everything to VMWare. It’s a whitebox Xeon 2.8, 2GB DDR RAM and 2 x 250GB SATA HDDs in RAID1. Very over-speced, but putting old hardware to good use.
Software
Post-installation
The installation of FreeBSD is quite simple so I won’t go over this. I will assume that you have just finished your installation and you have just logged into the terminal. FreeBSD by default does not permit root logins from SSH. We will open this up for the moment so we can work remotely. Close this again if you wish when we have finished. I would highly recommend doing so if SSH will be accessible from the Internet.
It is important to know the implications of allowing remote root logins. I have only allowed them here as the server is contained in my LAN and there are other mechanisms in place to secure the server. Using sudo or su with a normal user account and denying remote root logins is a better practice.
Open /etc/ssh/sshd_config
freebsd# vi /etc/ssh/sshd_config
Uncomment the line PermitRootLogin and save.
PermitRootLogin yes
Now restart SSHd
freebsd# /etc/rc.d/sshd restart
Stopping sshd.
Starting sshd.
You should now be able to login with the root account through SSH.
Package management
Package management in FreeBSD is great once you know a few basics. There are both packages and ports. Packages are pre built binaries of ports and are useful if you don’t want to compile and want a “generalised” distribution of that software. The ports concept is much more feature rich and allows the user to customise the features of the software during compile time. Anyone who has used Gentoo will be familiar with this idea – Portage is based on the concept of FreeBSD ports.
If you chose a minimal installation of FreeBSD, you will need to fetch the ports tree.
freebsd# portsnap fetch extract
Looking up portsnap.FreeBSD.org mirrors... 3 mirrors found.
Fetching public key from portsnap2.FreeBSD.org... done.
Fetching snapshot tag from portsnap2.FreeBSD.org... done.
Fetching snapshot metadata... done.
Fetching snapshot generated at Mon Jan 25 11:36:41 EST 2010:
9cf1fbc128d851da28f72f41aff6d52068036f4e5c169d  7% of   61 MB  516 kBps
...
...
/usr/ports/x11/yeahconsole/
/usr/ports/x11/yelp/
/usr/ports/x11/zenity/
Building new INDEX files... done.
In future, if you want to update the locally cached copy of the ports database use the following command
freebsd# portsnap fetch update
Looking up portsnap.FreeBSD.org mirrors... 3 mirrors found.
Fetching snapshot tag from portsnap2.freebsd.org... done.
Ports tree hasn't changed since last snapshot.
No updates needed.
Ports tree is already up to date.
Use the following to search the ports tree
freebsd# cd /usr/ports
freebsd# make search name="bash" | less
This will search for any package with bash in its name. I’ve piped it through less so that we can scroll up and down through the packages. Press q to stop this and get back to the shell.
...
...
Port:   bash-4.0.35
Path:   /usr/ports/shells/bash
Info:   The GNU Project's Bourne Again SHell
Maint:  obrien@FreeBSD.org
B-deps: bison-2.4.1,1 gettext-0.17_1 libiconv-1.13.1 m4-1.4.13,1
R-deps: gettext-0.17_1 libiconv-1.13.1
WWW:    http://cnswww.cns.cwru.edu/~chet/bash/bashtop.html
...
...
Install Bash
Coming from a Linux background, I am used to bash. One thing that annoys me with the default FreeBSD shell csh is that it doesn’t list matches when I double tap tab. I use the feature a lot in bash. There are a lot of other great shells, but for anyone coming from a Linux background, bash is the safest.
Notice in the above the path to where bash is. We need to change to this directory and then do the install.
freebsd# cd /usr/ports/shells/bash
freebsd#make config install clean
===> No options to configure
===>  Vulnerability check disabled, database not found
=> bash-4.0.tar.gz doesn't seem to exist in /usr/ports/distfiles/bash.
=> Attempting to fetch from http://ftp.gnu.org/gnu/bash/.
bash-4.0.tar.gz                                16% of 6084 kB  205 kBps
If you get any prompts about options for packages (such as M4), for the moment leave the defaults. FreeBSD will now go about fetching the sources and compiling the software. Depending on the hardware and Internet connection speed, expect anywhere from 10-30 minutes for bash to install as well as its dependencies.
...
===>  Cleaning for m4-1.4.13,1
===>  Cleaning for libtool-2.2.6b
===>  Cleaning for libiconv-1.13.1
===>  Cleaning for bash-4.0.35
freebsd#
Now change the default shell using the chsh command:
freebsd#chsh -s /usr/local/bin/bash
chsh: user information updated
When you log in the next time, your shell will now be bash. If you want to use bash now, type /usr/local/bin/bash.
Install Vim
Vi is installed with a minimal installation of FreeBSD. Vim is an improved version of Vi which gives us things like syntax highlighting. If you prefer other editors such as nano, pico or emacs, following these same steps should still give you enough information to be able to install them.
First search for vim in the root of the ports tree:
[root@freebsd /usr/ports]# make search name="vim" | less
Scroll down and find vim.
...
...
Port:   vim-7.2.344
Path:   /usr/ports/editors/vim
Info:   Vi "workalike", with many additional features
Maint:  obrien@FreeBSD.org
B-deps: gettext-0.17_1 glib-1.2.10_13 gtk-1.2.10_21 ...
R-deps: gettext-0.17_1 glib-1.2.10_13 gtk-1.2.10_21 ...
WWW:    http://www.vim.org/
...
...
Change to this directory and do the install.
[root@freebsd /usr/ports]# cd editors/vim
[root@freebsd /usr/ports/editors/vim]# make config install clean
This is going to take a while. Python and Perl are dependencies which are pretty large ports themselves. Once its done create the ~/.vimrc file with the following contents. This will enable syntax highlighting as well as a few other handy things.
set nocompatible " must be the first line
filetype on
filetype indent on
filetype plugin on
set laststatus=2
syntax on
Now we will have a much friendlier Vim with similar configuration as a majority of Linuxes.
Install NTP
We search for and install NTP like the rest of the ports. First lets search for it.
[root@freebsd /usr/ports]# make search name="ntp" | less
Find NTP and note its location in the ports tree.
Port:   ntp-4.2.6p1.r2
Path:   /usr/ports/net/ntp
Info:   The Network Time Protocol Distribution
Maint:  cy@FreeBSD.org
B-deps: autoconf-2.62 autoconf-wrapper-20071109...
R-deps:
WWW:    http://www.ntp.org/
Now install it.
[root@freebsd /usr/ports/net/ntp]# make config install clean
Leave the default options for NTP if prompted.
For now, don’t worry about configuring ntp. We will do this a bit later on as there are a couple of other things we need to do before we get ntp up and running.
Enable PPS support for FreeBSD
Pulse Per Second is supported natively in the FreeBSD kernel sources. PPS kernel support will give us better accuracy as the PPS process is offloaded to the kernel and not run in user space. NTP can be run with or without kernel PPS support but seeing as we are using FreeBSD and not Linux for the reason that FreeBSD will give us better accuracy, we may as well make the most of what we have got.
Although PPS is supported, we need to recompile the kernel. WAIT! Don’t go. I can almost hear the sigh and the backspace key being pressed, taking you back to Google to see if there is a better way. Recompiling the FreeBSD kernel basically as simple as installing a port. Forget about initrds, updating bootloaders, selecting the correct drivers, making modules and installing them!
Lets install the kernel sources. We do this by running sysinstall then choosing Configure, then Distributions then src then select base and sys.
Once this is installed, change to the sources and we will make a custom configuration for our kernel.
[root@freebsd /usr/ports/net/ntp]# cd /usr/src/sys/i386/conf/
[root@freebsd /usr/src/sys/i386/conf]# cp GENERIC PPSGENERIC
Now open up PPSGENERIC in Vim (or whatever text editor you are using) and add the following line to enable PPS support.
# PPS Support
options         PPS_SYNC
Now we change back to the /usr/src directory and we can begin building our new custom kernel
[root@freebsd /usr/src/sys/i386/conf]# cd /usr/src/
[root@freebsd /usr/src]# make buildkernel KERNCONF=PPSGENERIC
...
some time later...
...
ld -Bshareable  -d -warn-common -o zlib.ko.debug zlib.kld
objcopy --only-keep-debug zlib.ko.debug zlib.ko.symbols
objcopy --strip-debug --add-gnu-debuglink=zlib.ko.symbols zlib.ko.debug zlib.ko
--------------------------------------------------------------
>>> Kernel build for PPSGENERIC completed on Mon Jan 25 18:41:50 EST 2010
--------------------------------------------------------------
[root@freebsd /usr/src]# make installkernel KERNCONF=PPSGENERIC
Now reboot and you will be running your new kernel!
Configure the Garmin GPS 18 LVC
The default configuration of the Garmin GPS 18 LVC gives a very verbose output. What we want to do is modify the sentences that it will send to NTP to be as minimal as possible. When I was running Linux, I used the stock configuration and it was only later that I realised that the GPS time was being rejected as the time it took to send over all the sentences was too long for the software to handle.
We use a Garmin software utility called SNSRCFG.exe to configure the GPS unit. You can get it from the Garmin website here. You will need to use a Windows PC, I’ve tested both Windows 7 and Windows XP, both work fine. I used a USB to serial adapter which I didn’t have any problems with. You can configure the unit directly through FreeBSD and Linux, but using this utility is by far the easiest.
Start the program and select GPS 18 PC/LVC for the device. Press F6 to enter the sensor configuration and make sure the baud rate is set to 4800 and the PPS Length is set to 200. Although you can specify the speed of the serial device in the NTP config file, I could not get the unit to respond on any baud rate other than 4800.
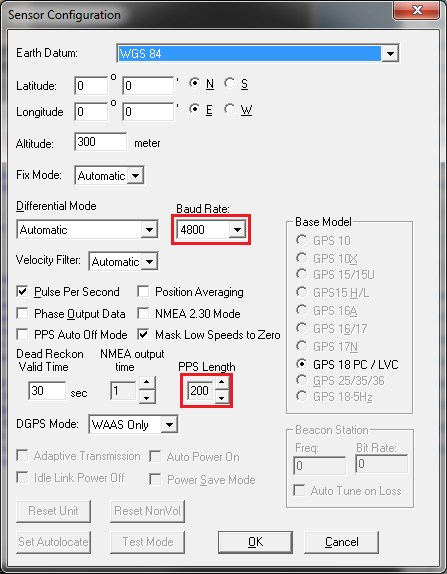
Click OK and now press F7 so we can select our sentences. Select only GPGGA and GPRMC. Technically GPRMC is only required for NTP to work, but GPGGA can also be used. Having only these sentences will make communications with NTP far quicker than the default configuration before. Note that this does not have anything to do with the overall accuracy! The microsecond accuracy is achieved using the PPS and is not dependant on GPS sentences.

Once we have made these selections, go to Comm > Setup and make sure the correct serial port is selected. Now click the connect button
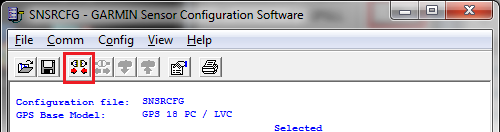
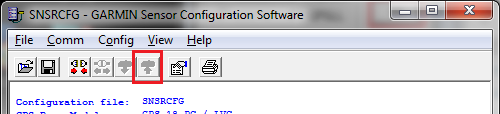
Once we have connected, we can then upload our configuration to the GPS unit. Note that it is greyed out here. I don’t actually have access to the GPS unit as I am writing this. If you get a message about downloading the configuration from the device, cancel this and proceed to the upload.
Once this is done, you can connect the GPS unit back to your FreeBSD server.
Serial and Symlinks
I had a hard time understanding serial ports in FreeBSD 8.0. When looking up documentation on serial ports and names, all the documentation was pointing to /dev/ttyXX and /dev/cuadX. I eventually figured out I was after /dev/cuauX. In my case I use /dev/cuau0 as the first serial port.
We also want to disable the serial lines that can be used to log in to a console. This could potentially lock the serial port from being used by NTP.
Open /etc/ttys and comment out the following lines:
# Serial terminals
# The 'dialup' keyword identifies dialin lines to login, fingerd etc.
# ttyu0   "/usr/libexec/getty std.9600"   dialup  off secure
# ttyu1   "/usr/libexec/getty std.9600"   dialup  off secure
# ttyu2   "/usr/libexec/getty std.9600"   dialup  off secure
# ttyu3   "/usr/libexec/getty std.9600"   dialup  off secure
Now we also need to make a symlink from our serial port to a pseudo GPS device, /dev/gps1. NTP will look for this device when it is started. We don’t tell NTP what serial port to expect a GPS device on, NTP expects it to be /dev/gpsX and in our case when we configure the ntp.conf file, it will look specifically for /dev/gps1.
We create this link in /etc/devfs.conf. Add the following to that file.
link cuau0 gps1
For simplicity sake, reboot the server to apply the changes.
Configure NTP
Now we can finally configure NTP to use the GPS device as a time source. A basic line in a ntp.conf file would look something like this
server 192.168.0.123
This would add 192.168.0.123 as a time source to NTP. How we add the GPS unit to NTP is very simmilar. We still use a numerical “IP” address but this IP address is treated differently by the NTP software. These special IP addresses are clock drivers and there are quite a few different types. If you are interested, have a look here at all the different types supported.
We will be using type 20, “Generic NMEA GPS Receiver (NMEA)” clock driver. This uses both the information from the GPS sentences and the PPS to derive the time, precice to 1us. It has the special IP address 127.127.20.x where x is the number of the GPS unit in /dev/gpsx. Open /etc/ntp.conf and make the following edits and additions.
# Comment out the freebsd servers
#server 0.freebsd.pool.ntp.org iburst maxpoll 9
#server 1.freebsd.pool.ntp.org iburst maxpoll 9
#server 2.freebsd.pool.ntp.org iburst maxpoll 9
#
# Garmin GPS 18 LVC
server  127.127.20.1    mode 0  minpoll 4 maxpoll 4   prefer
fudge   127.127.20.1    flag1 1  flag3 1 refid GPS
#
# By default we don't want eveyone to be able to query and modify
# the server. This is different from serving out NTP time to clients
restrict default noquery nomodify
#
# Allow this machine access to query NTP's statistics etc...
restrict 127.0.0.1
The mode 0 option means that NTP will use any available GPS sentences to get the time, minpoll and maxpoll is a multiple of 4 of how often the time source will be queried (so 16 seconds for us). As far as I can tell, in our case seeing as we are using the PPS, the update is acually every second. The difference is that when we query NTP about our time sources, information about the GPS unit gets updated every 16 seconds. The reachability of the GPS device and a GPS fix will be updated every 16 seconds. Prefer means that this is the prefered time source. The maxpoll statement is not needed in ntp > 4.2.6 as it will be the same as minpoll for local clock drivers. Thanks to Dave Hart for the info.
The fudge flags are extra settings that we can apply to the time source. If you read this page you can see all the flags that can be set on this time source. I will only go over what we have here. Flag1 1 enables PPS processing which we defiantely want turned on. Flag3 1 enables kernel PPS support. If this is set to 0, NTP will handle the PPS. If we didn’t have PPS support in the kernel, we would set this to 0.
Starting NTP
Before we start NTP, we quickly want to sync the system clock just to make sure it is not too far away from the actual time that it will receive from the GPS unit. NTP will fail if the offset is too great.
[root@freebsd ~]# ntpdate pool.ntp.org
25 Jan 20:45:21 ntpdate[1032]: step time server 202.174.101.10 offset -3.497534 sec
Now we will alter the /etc/defaults/rc.conf file to use the newer NTP package that we installed instead of the one that ships with FreeBSD. This way we can use the name rc script.
[root@freebsd ~]# sed -i '.bak' 's|/usr/sbin/ntpd|/usr/local/bin/ntpd|' /etc/defaults/rc.conf
Next add ntpd to /etc/rc.conf so it starts upon boot.
ntpd_enable="YES"
Now we can finally start NTP.
[root@freebsd ~]# /etc/rc.d/ntpd start
Starting ntpd.
A bit of an anticlimax really :( . All that matters now is that the GPS unit is providing NTP with the time information. We can check this by doing an ntpq -p.
[root@freebsd ~]# ntpq -p
 remote           refid          st t when poll reach   delay   offset  jitter
==============================================================================
*GPS_NMEA(1)     .GPS.            0 l    5   16  377    0.000   -0.001   0.002
If all is well, the reach entry should slowly climb up to 377. This will take a few minutes but as long as it is not 0 and stays at 0 as this would indicate that there is a problem somewhere. Notice the offset – this is how far the time source is away from the local clock. Remember with NTP, we are keeping the servers local clock in sync as much as possible.
Troubleshooting
Check you can access the device and verify the sentences
We can use a utility called cu to check. I found that I had to log into another session and run killall cu to end this process as Ctrl+c didn’t work. In the comments Joel pointed out in order to terminate the cu session you need to enter return then ~ then . and remember to stop NTP before performing the following.
[root@freebsd ~]# cu -l /dev/gps1 -s 4800
Connected
$GPRMC,101003,A,1111.1111,S,22222.2222,E,000.0,250.1,250110,011.8,E*6D
You should be seeing both $GPRMC and $GPGGA sentences. An important value to lookout for in the $GPRMC sentince is the third value along: A. This means that the GPS unit has a fix. If it is U, it means that it does not have a proper GPS fix and will not provide the time to NTP.
Verify the baud rate
Make sure the baud rate is set to 4800. I originally had the baud rate set to 9600 but I could not get NTP to detect the device. There are extra flags you can pass to NTP to change the baud rate that it will connect with, but I still could not get it to work. I was only after I changed it back to 4800 that it started to work.
Double check the wiring
I know this is a simple one, but double check everything! If you soldered a mini DIN connector, make sure there are no shorts around this. My PPS line was originally shorting to the ground which made for some interesting results. Once this was fixed, everything was up and running perfectly. Use a multimeter and verify everything.
Don’t use USB serial ports
You should only be using a physical serial port. Driver support for USB serial adapters is flaky at best, even on Windows. When I was using Linux with a USB to serial adapter to test the GPS unit, I could not get the PPS to work. It was only later that I realised the problem was the USB to serial adapter (not sure if it was the adapter itself or the Linux driver). In anycase, you will lose precision with a USB to serial adapter.
High offset and jitter
When I started to graph the offset, I noticed that NTP was floating between 20us +/-. It was after I turned the climate controll system off in the building that the offset began to float around 3us +/- which is quite precise. As NTP is used to discipline the local clock, which is usually a crystal oscillator, the tinyest variations in temperature changes the frequency of which the oscillator functions. NTP can adjust for these variations, but if they happen too quickly, then the offset can be eratic.
I have also found if the cable between the serial port and the GPS receiver is longer than 5 meters, you will get pretty erratic results. Think that two meter serial extension won’t matter? Well I can confirm it does!